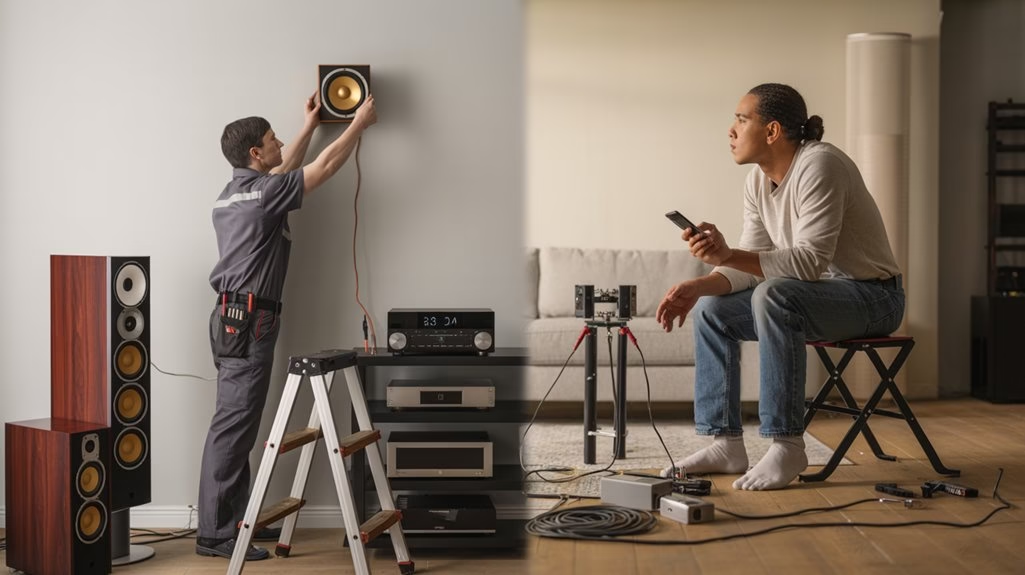
Deciding between DIY and a pro comes down to your skills, room, and risk tolerance. DIY saves money and gives control, but calibration, wiring, and firmware hiccups can frustrate and hurt performance. Pros optimize placement, tune fast, hide cables, and back work with support and warranties. Assess acoustics, size, and seating; hard rooms need treatment. If you DIY, plan tools, routing, and calibration. If time matters, hire out. Up next, you’ll see precise placement and setup tips to get it right.
Key Takeaways
- DIY saves on labor and offers placement control, but risks calibration errors, messy cabling, and potential warranty issues.
- Pros handle room assessment, speaker positioning, and wiring quickly, delivering optimized sound with warranties and support.
- Evaluate your room’s acoustics, size, and shape; add panels, rugs, and seal gaps to improve clarity and isolation.
- Be honest about tech comfort and risk tolerance; firmware, drilling, and measurements can challenge beginners.
- For long-term satisfaction, pros reduce common pitfalls, while DIY results vary; plan for future upgrades and maintenance.
Pros and Cons of DIY Surround Sound Installation
Although DIY surround sound can be appealing, you should weigh the savings and flexibility against the risks. A DIY installation offers potential savings by skipping service fees and gives you control over speaker placement, wiring routes, and system tweaks in your home theater system.
You’ll gain hands-on experience and the satisfaction of building your own surround sound setup. However, you may face steep learning curves, time-consuming calibration, and troubleshooting that can still yield suboptimal performance.
Mistakes can damage expensive gear or void warranties, and cable management often looks less polished than a professional installation. Precise leveling, phase alignment, and room correction demand expert knowledge you mightn’t have.
If you proceed, plan thoroughly, test methodically, and protect components to avoid costly errors while pursuing customization.
For NJ homeowners, remember that professionals can deliver faster, warranty-backed installations using mass-loaded vinyl and other high-performance materials, while DIY routes may save money but risk inconsistent results.
Benefits of Hiring a Professional Installer
If DIY tradeoffs give you pause, a professional installer delivers optimized performance without the guesswork.
Professional installers handle complex systems daily, so they fine-tune speaker placement, wiring, and integration with your existing home audio gear quickly and correctly. You’ll get tailored installation services that avoid technical errors, cut hours—or days—off setup time, and deliver a cohesive soundstage from the start.
Pros fine-tune placement, wiring, and integration—avoiding errors and delivering a cohesive soundstage fast.
Plus, ongoing support keeps you covered, and warranties on equipment and labor protect your investment.
1) Feel confident: You’ll hear cleaner dialogue, tighter bass, and seamless surround that makes movie nights unforgettable.
2) Save time: Skip trial-and-error; pros finish in hours, not weekends.
3) Rest easy: Peace of mind comes from trusted support, documented warranties, and a system ready for future upgrades.
Professionals can also apply room-focused techniques like acoustic paneling and sealing penetrations to reduce echoes and prevent sound leakage, enhancing clarity and isolation.
Assessing Your Room: Acoustics, Layout, and Wiring
Before you mount a single speaker, size up the room’s acoustics, layout, and wiring so your system performs as designed. Start by evaluating room acoustics: hard surfaces reflect and exaggerate highs, while rugs, curtains, and furniture absorb and smooth reflections.
Consider room size and shape; large or irregular spaces may need additional speakers or a stronger receiver to fill gaps.
Refine speaker placement. Center and fronts should sit at ear level, with surrounds symmetrically flanking the listening position for a coherent soundstage. Angle speakers toward the main seat and keep distances consistent.
Plan wiring for a surround sound system early. Route cables through walls or baseboards to reduce clutter and interference.
Add acoustic panels or bass traps to tame echoes and boom. When uncertain, consult professional AV.
For better isolation and less noise leakage, seal gaps and penetrations with acoustic sealant to maintain an airtight barrier.
Essential Tools and Gear for a DIY Setup
Even with smart planning, your DIY surround build hinges on having the right tools and gear. For this DIY project, gather the essential tools first: an AV receiver, satellite speakers, a subwoofer, quality speaker wire, and at least one high-speed HDMI cable for your sound system.
Add a stud finder for safe mounting, a level to align speakers, and cable management gear—clips or raceways—to keep runs tidy and discreet. Use a sound meter app to set balanced levels later without drifting into professional installation territory.
1) Feel confident: you’ve got a complete speaker system toolkit ready.
2) Feel proud: clean cable management makes your room look curated.
3) Feel in control: measured choices beat guesswork, saving time and rework.
For better audio and less noise leakage, plan simple DIY soundproofing basics like sealing gaps with acoustic sealant and adding acoustic panels or curtains to improve room acoustics.
Speaker Placement and Calibration Best Practices
With your tools and gear sorted, focus on where each speaker sits and how it’s tuned. Nail speaker placement first: keep fronts at ear height, 22–30 degrees from center; place surrounds 90–110 degrees behind you, also near ear level.
Form a circle around the listening position, and keep at least a foot from walls to avoid reflections and bass bloom. Match distances so fronts and surrounds are equally spaced; target about 1.5–2.5 times the front-to-seat distance for surround sound cohesion.
Next, do calibration. Use a sound level meter and set each channel to roughly 75 dB at the main seat. Run room correction software or a calibration mic to smooth frequency response and boost audio quality. For even clearer dialogue and tighter imaging, treat first reflection points with acoustic panels to reduce echoes and reverberations.
Professional installation speeds accuracy; a careful DIY setup achieves excellent results.
Smart Integration and Hidden Cabling Options
Two upgrades elevate a home theater fast: smart control and hidden cabling.
Pair your surround sound system with smart home devices so you can tweak audio settings, switch inputs, and trigger routines from your phone, tablet, or voice assistant. Automations set the mood: lights dim, the receiver powers up, and speakers match the content profile—no menu diving.
Hidden cabling keeps the room clean and safer, reducing interference while enabling ideal speaker placement.
Professional installers excel at in-wall and in-ceiling runs, conduit planning, and code‑safe terminations; DIY vs professional comes down to your comfort with cutting, fishing, and patching.
1) Feel the calm of a clutter‑free room.
2) Hear clearer detail from precisely placed speakers.
3) Enjoy effortless control that makes every movie night seamless.
For added elegance, integrate discreet tech like hidden speakers and motorized shades so performance and design stay in harmony.
Cost, Time, and Risk: How to Choose the Right Path
Three variables shape your installation choice: cost, time, and risk. In a DIY vs professional decision, weigh upfront savings against long-term outcomes.
DIY cuts labor cost, but mistakes can damage gear, void warranties, or cause hidden expenses. Professional installations cost more initially, yet they optimize performance, include workmanship warranties, and reduce future repair bills.
DIY saves labor, but risks costly mistakes. Pros cost more upfront, deliver optimized performance and lasting protection.
Time matters. DIY often stretches over weekends due to research, wiring, and troubleshooting. Pros finish in hours, so you enjoy your system sooner.
Consider your comfort with technology and complex setups—if you’re unsure, hire a professional to prevent common pitfalls.
Assess risk tolerance. Are you prepared to drill, calibrate, and update firmware? If yes, DIY can work. If not, professional installations offer safer, predictable results and higher long-term satisfaction.
Frequently Asked Questions
What Is the Best Way to Install Surround Sound?
Install it by planning Speaker placement around your Room dimensions, keeping fronts and surrounds at ear level and equidistant.
Choose a Receiver selection that matches your channels and power needs.
Treat reflections with basic Acoustic treatment.
Route tidy Wiring options, label runs, and avoid power interference.
Mount securely, then run Sound calibration with a meter or auto-setup.
Adjust crossover, distances, and levels, test familiar content, and fine-tune sub integration for balanced immersion.
How Much Does It Cost to Get a Surround Sound System Installed?
Imagine dollar signs aligning with speakers. You’ll typically pay $200–$500 for professional services, plus $100–$200 for calibration to boost sound quality.
Installation costs rise with wall mounts, wiring concealment, and smart integration, adding 20%–40% in hidden fees.
DIY expenses can cut 30%–50%, but equipment pricing and tool purchases still add up. If you reuse components, you might spend $100–$300.
Compare quotes, scope complexity, and priorities before choosing.
What Is the Best Surround Sound Setup for a Home?
The best surround sound setup fits your room and budget considerations.
Start with a 5.1 system; upgrade to 7.1 or Dolby Atmos if space allows.
Prioritize quality audio equipment, correct speaker placement at ear level, and a cornered subwoofer.
Optimize room acoustics with rugs and treatments.
Consider wireless options for easier placement.
Run system calibration or room correction software to balance levels and timing.
Test, tweak, and enjoy a balanced, immersive soundstage.
What Is the Best Way to Setup a 5.1 Surround Sound?
Hit the nail on the head: place L/C/R at ear level, equidistant; put surrounds slightly above ear level to the sides or just behind; position the sub near the front or corner, then subwoofer crawl.
Prioritize speaker placement, room acoustics, and equipment compatibility. Hide wires with smart cable management.
Run audio calibration (Audyssey, YPAO, MCACC), match distances and levels, then do sound testing with reference tracks and sweeps.
Tweak crossover and phase last.
Conclusion
In the end, you’re the conductor choosing your baton. If you DIY, you carve the staff lines yourself—measuring walls, hiding cables like roots, tuning speakers until the room breathes. If you hire a pro, you step onto a lit stage, trusting practiced hands to set the scene. Either way, the first note is a key turning in a door. Open it, and let your room become a horizon where quiet turns to tide and sound becomes home.