DIY soundproofing can cut costs and tame moderate noise using mass-loaded vinyl, acoustic panels, and careful sealing, but set realistic expectations. If you’re battling impact noise, flanking paths, rattling doors, or need code-compliant, high-STC assemblies, call the pros. Experts diagnose leaks, optimize mass, damping, decoupling, and absorption, and finish faster with safer materials. Quiet spaces boost focus, privacy, and property value. SoundProof San Diego brings 19+ years of targeted solutions. Keep going to see when DIY works and when expertise wins.
Key Takeaways
- DIY suits minor echo control and simple sealing; expect modest improvements, not full isolation.
- Call experts for persistent noise, flanking paths, or structure-borne/impact sound issues.
- Professional assemblies achieve higher STC (50+) with proper mass, damping, decoupling, and airtight seals.
- Complex projects, code compliance, and fire-rated assemblies warrant professional installation.
- Pros deliver faster timelines, diagnostics, and tailored solutions; DIY saves labor but risks delays and weak points.
Why Quiet Spaces Matter for Homes and Businesses
Even in a busy city or a buzzing office, a quiet space gives you control: it protects focus, reduces stress, and safeguards privacy. You feel the difference immediately—quiet spaces sharpen concentration and curb fatigue caused by constant interruptions.
In residential or commercial settings, soundproofing supports confidential conversations and uninterrupted work, while targeted noise control improves comfort in medical offices and schools. In New Jersey’s competitive market, buyers often pay premiums for quiet homes, with STC ratings helping quantify noise control performance that can boost appeal and resale value.
At home, traffic and nightlife can erode rest; proper soundproofing restores calm, enhances mood, and improves sleep.
In workplaces, reducing echoes and improving sound quality lowers stress and boosts performance. You create zones where meetings, learning, and healing happen without distraction.
Prioritizing quiet spaces isn’t a luxury—it’s a practical way to protect well-being, productivity, and privacy across every environment you use.
Understanding How Sound Travels and Is Controlled
While noise feels chaotic, it follows clear rules: sound travels as waves through air and solids, and you can control it by targeting how those waves move.
Airborne noise passes through openings and thin partitions; impact noise rides structural elements like floors and pipes. Hard surfaces reflect energy, raising reverberation, while soft finishes boost sound absorption and noise reduction inside a room.
You’ll also contend with flanking paths—hidden routes that cause noise leakage around doors, through ceilings, or via ducts.
To gauge performance, use STC to understand how well assemblies block airborne sound and NRC to compare absorption materials. A careful DIY approach can improve comfort, but complex paths and diagnostics often require professional soundproofing.
Experts design integrated soundproofing solutions that address direct and indirect transmission.
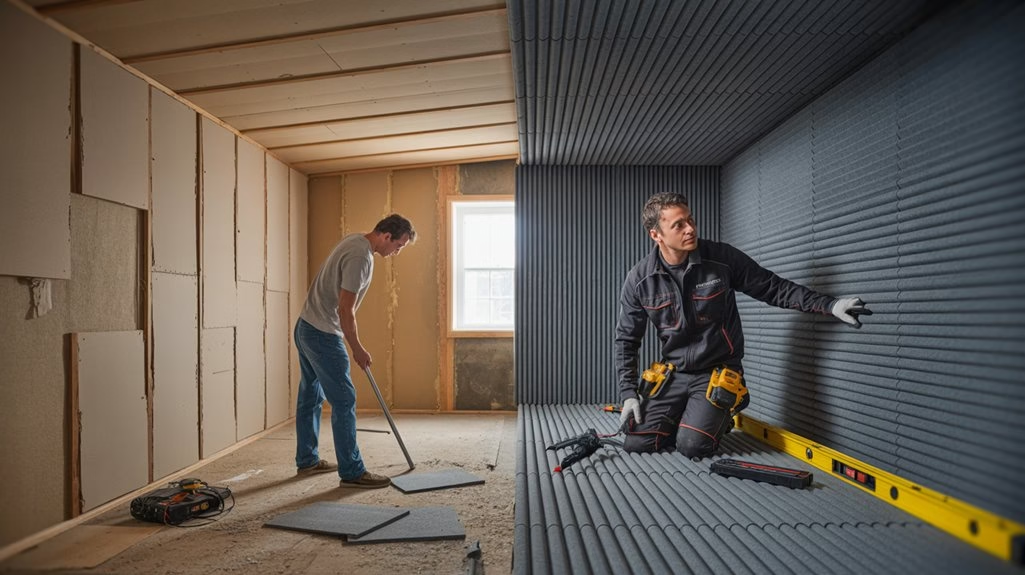
For maximum isolation during construction, professionals often recommend wall decoupling, the “room within a room” approach that separates wall layers to stop vibrations from passing through.
Core Principles: Mass, Damping, Decoupling, and Absorption
Because soundproofing succeeds when you control how vibrations move and die out, focus on four core levers: mass, damping, decoupling, and absorption.
Add mass with dense barriers—concrete or mass-loaded vinyl—to impede sound waves. Use damping compounds and viscoelastic layers to convert vibration into heat, cutting resonance.
Apply decoupling with resilient channels or sound clips to break the rigid path that lets structure-borne noise jump between walls, floors, and ceilings. Deploy absorption with acoustic panels or foam to trap reflections, reducing echo and improving clarity.
For effective soundproofing projects, combine these principles. Layer mass with damping, then decouple, and finish with targeted absorption.
In DIY plans, match solutions to the noise type: impact or airborne. Integration, not any single tactic, drives reliable results.
To benchmark results, aim for an STC 55–60 wall assembly by combining mass-loaded vinyl, double drywall with Green Glue, and proper sealing for strong isolation.
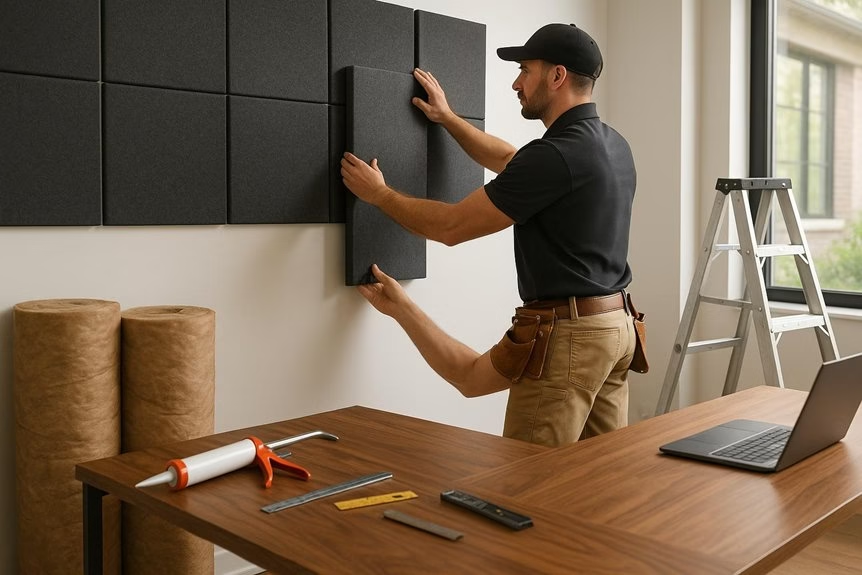
DIY Soundproofing: Benefits, Risks, and Realistic Outcomes
Although DIY soundproofing can trim project costs by up to 50% on labor, it demands time, careful planning, and steady hands.
You’ll weigh pros and cons: savings versus the time and effort required, flexibility versus the risk of noise leakage from gaps, shortcuts, or unsafe materials.
With DIY soundproofing, you can reduce noise modestly, but results depend on how well you measure, seal, and layer. Adding dense floor underlayment and mass loaded vinyl between drywall layers can raise STC and improve both impact and airborne noise control when combined with proper sealing.
DIY soundproofing offers modest noise cuts—success hinges on precise measuring, thorough sealing, and careful layering.
1) Choose soundproofing materials wisely. Mass-loaded vinyl and acoustic panels help, yet they’re less effective than pro-grade options and some DIY panels may miss fire safety marks.
2) Follow vetted methods. Pre-plan seams, caulk penetrations, and verify proper fastening to avoid weak points.
3) Be realistic. Expect improved absorption and minor isolation—not full room-to-room blocking without structural upgrades.
Signs Your Project Requires a Professional
Even with careful DIY work, certain red flags tell you it’s time to call a pro. If city noise still punches through, you likely need higher STC assemblies; hiring professionals can deliver soundproofing measures that reach 50+ STC, far beyond standard drywall’s 35.
Persistent sound leaks, flanking paths, or noise coming through floors, ceilings, or ducts indicate hidden transmission routes that require professional expertise and diagnostic testing.
A critical factor is safety and compliance. If the job calls for structural changes, resilient channels, mass-loaded barriers, or other heavy materials, pros guarantee safe installation and code alignment.
When your results stall—rattling doors, buzzing walls, or uneven reduction—bring in experts with advanced materials and methods. They’ll evaluate your specific needs, verify weak points, and implement reliable, measurable improvements. For example, professionals can specify resilient channels or sound isolation clips to decouple surfaces and achieve higher STC performance.
Custom Solutions for Different Rooms and Uses
When DIY fixes hit a ceiling or a pro flags hidden leaks, the next step is tailoring the solution to each room’s purpose.
Rooms behave differently: home theaters crave isolation and tight bass control; offices need speech privacy; recording studios demand pristine capture.
Custom solutions align soundproofing measures with room size, construction, and use, targeting weak points for maximum impact—whether you go DIY or professional.
- Home theaters: Decouple walls, seal doors, and add bass traps. Use acoustic panels to tame reflections and improve clarity without deadening excitement.
- Offices: Prioritize speech privacy with door seals, ceiling treatments, and strategic panels; address flanking paths around ducts and glazing.
- Recording studios: Build room-within-a-room where feasible; control resonance with tuned traps and broadband panels matched to specific requirements.
For tougher noise problems or mixed-use spaces, integrate resilient channels and Green Glue with airtight seals to boost STC and minimize both airborne and structure-borne transmission.
Materials, Codes, and Safety Considerations
Before you buy anything, match materials to the job and the rules that govern it. Start with STC ratings: higher numbers block more sound. Professional-grade materials often reach STC 50+, which matters for shared walls, ceilings, and multifamily boundaries.
Pick purpose-built options—mass-loaded vinyl for walls, acoustic underlayment for floors, and properly decoupled assemblies—to stop flanking and leaks.
Choose purpose-built materials—MLV for walls, acoustic underlayment, and decoupled assemblies—to eliminate flanking paths and leaks.
Check local codes before you go DIY. Permits, inspections, and approved methods protect safety and compliance. Fire ratings are nonnegotiable; acoustic panels, insulation, and adhesives must meet required classifications for residential and commercial spaces.
A professional verifies listings, chooses compatible materials, and installs them correctly to avoid hidden gaps, short-circuited assemblies, or structural issues. When in doubt, lean on expert guidance to guarantee performance and safety.
In New Jersey, consider noise ordinances, warranty coverage, and potential fines when deciding between DIY and professional soundproofing to ensure compliant, long-lasting results.
Cost, Time, and Performance: DIY vs. Pro Comparison
Codes and materials set the rules; now the question is what it costs—in dollars, hours, and results—to do it yourself or hire a pro. A DIY project can deliver cost savings—often up to 50% on labor—but it can stretch timelines and risk underwhelming performance if installation or materials miss the mark. Proper sealing and decoupling can boost STC ratings and improve isolation without overspending.
Professional soundproofing finishes faster, adheres to codes, and targets noise reduction goals for bedrooms, studios, and home theaters.
- Cost: DIY trims labor, but redo work erases savings. Pros optimize layers and seals, minimizing waste.
- Time: Expect DIY trial-and-error; pros use specialized tools to complete in a fraction of the time.
- Performance: Standard drywall hits STC ~35. Pro assemblies exceed 50+, reduce sound leakage, and tailor solutions to room size and purpose while meeting safety standards.
How SoundProof San Diego Can Help You Get Results
Even if you’ve tried DIY, SoundProof San Diego turns guesswork into proven results. With 19+ years in sound isolation, they diagnose where noise enters your home or business and engineer targeted fixes.
Even after DIY attempts, they turn guesswork into proven results with targeted sound isolation fixes.
Their team conducts thorough assessments, pinpoints sound leaks, and designs solutions that absorb sound and stop transmission at the source.
Hiring a Professional here means you get a full toolkit: soundproofing, acoustic treatment, sound testing, and consulting for residential and commercial projects.
They use state-of-the-art materials and methods to create a quieter workspace, studio, or living area—boosting comfort and productivity without costly trial and error. They often combine resilient channels with damping compounds and double-layer drywall to significantly raise STC and reduce structure-borne noise.
Ready for results you can hear? Call 858-876-4874 for expert guidance, clear recommendations, and tailored installations that perform as promised.
Frequently Asked Questions
How Much Does Professional Soundproofing Cost?
Professional soundproofing typically costs $1,500–$5,000, or about $25–$50 per square foot.
Your price depends on cost factors like room size, soundproofing materials, installation techniques, and whether you add acoustic panels.
Larger projects or commercial spaces can exceed $10,000.
You’ll often boost STC ratings and home value.
Get a professional assessment—many offer free consultations—to pinpoint noise sources, refine scope, and avoid overspending while achieving the isolation level you actually need.
Does DIY Soundproofing Work?
Yes, DIY soundproofing works—until it doesn’t. You’ll see DIY materials effectiveness with smart noise reduction strategies, but a soundproofing techniques comparison shows limits.
Acoustic panels benefits help tame echoes, not block sound. Homeowner soundproofing mistakes—poor sealing, misaligned layers—cause leaks.
For cost effective soundproofing solutions, use mass-loaded vinyl, caulk, and door sweeps, then test. When you need higher STC and fewer retries, reconsider your approach—or your expectations.
Who Is Responsible for Soundproofing?
You’re typically responsible alongside the property owner or landlord.
Landlords must meet building codes for noise reduction and sound isolation in multi-unit dwellings, while you handle interior choices and upkeep.
In commercial spaces, businesses bear responsibility to protect confidentiality.
You can add acoustic panels and other soundproofing materials, but complex installation techniques often require pros to guarantee compliance and performance.
Document responsibilities in leases and specs to clarify maintenance, upgrades, and acceptable noise thresholds.
How Do Professionals Soundproof a Room?
Professionals soundproof a room by evaluating your room layout, then choosing smart material selection and insulation types.
They seal leaks, add mass-loaded sound barriers, and place acoustic panels for absorption.
They use decoupling and damping installation techniques to reduce vibrations between walls, floors, and ceilings.
They integrate door sweeps, resilient channels, and dense drywall, ensuring code compliance.
With precise measurements and specialized tools, they deliver faster, cleaner results than DIY, with predictable noise reduction.
Conclusion
When quiet finally settles, it’s like closing a sturdy door on chaos and opening a window to focus. You’ve learned how sound sneaks through cracks and how mass, damping, decoupling, and absorption are the tools in your toolkit. DIY can patch the leaks; pros build the dam. Watch for red flags—codes, complex rooms, performance targets. Choose wisely, save time, and protect your investment. When you’re ready to hear the difference, SoundProof San Diego turns noise into a whispering horizon.